Window condensation

Few words about condensation
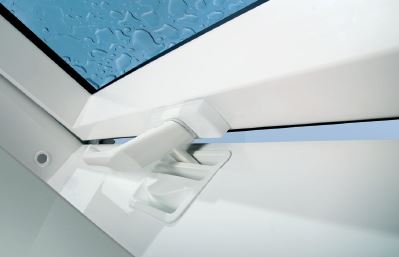
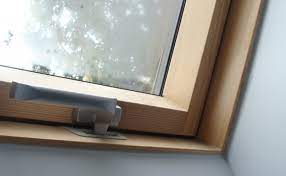
A common problem with windows is so called "sweating window", it mainly occurs on roof windows. Because they are mounted on the roof, they are particularly exposed to environmental impacts such as rain, hail and temperature changes. How it occurs? When a hot, humid air hits the cold window, it cools down and some of the moisture condenses on the window (the transition from steam to water is called condensation). The better the insulation in the attic, the higher the condensation level. Despite of the water vapor diffusion in the insulation layer, water vapor stays in the room / attic. Both new buildings and old but well-renovated buildings are particularly tight nowadays, which is of course good for the energy balance, but not perfect for the indoor climate. This means that moisture generated inside cannot escape.
A small amount of water vapor, which mainly settles on the glass and the surrounding elements, can be considered as a normal process. However, if you find that your window is filled with water vapor between the windows, it means that the window has lost its heat-insulating properties and must be replaced.
Especially during the winter season, you can see that small drops of water form not only on the window but also on the window frame. Condensation occurs mainly after activities that cause a high moisture level, e.g. cooking, washing or showering. This means that humidity plays an important role in counteracting condensation. It is known that water always arises where the warm, humid air meets a cold surface. As a result of the cooling, the air can retain less moisture, so that an excess is condensed and in the form of water droplets appears on the cold surface. The room temperature therefore plays an important role, as does the temperature difference between inside and outside. If the temperature differences are higher than 20 ° C and the humidity is above 60%, condensation occurs. Condensation occurs mainly during the colder season when the temperature differences between day and night are extremely high. When the air is heated, the condensation evaporates. If there are other factors, such as a lot of snow on the windows, in extreme situations it can even lead to condensation freezing on the inside of the frame and damaging the structure, especially wooden windows.
In general, condensate is not harmful. There are two areas where condensation can have a negative impact though:
- On the one hand, it stays on window's elements - wood is of course particularly sensitive here - but also the cladding around the window, which is often made of plasterboard. Moisture cam create the mold on such surfaces and destroy them.
- The second area is the health of the inhabitants. Living in a humid environment can lead to coughing and shortness of breath. And once mold occurs, there are other negative effects on health e.g. allergic reaction.
how to stop condensation on windows?:
- Short-term ventilation - the windows should be fully opened 3-5 times every day for 10-15 minutes at a time. If there is a possibility to do a draft, it is even better. To do this, simultaneously open two roof winows that are placed opposite each other. In this way, you can quickly achieve an air exchange with minimal heat loss.
- Windows with natural ventilation - this allows a constant air exchange between the damp inside with fresh outdoor air even when the window is closed.
- Keep the room temperature as constant as possible throughout the day. Recommended temperatures: bedroom 18 ° C, children's room, bathroom 23 ° C, basement - not less than 15 ° C. The humidity should be between 40-60% in the apartment and up to 70% in the bathroom.
- Regularly remove condensate / water vapour to prevent mold.
- Location of radiators. It is recommended to install a radiator under each window. There should be a distance of at least 10 cm between the window sill and the radiator to ensure the hot air circulation. In this way, the extreme cooling of the window glass can be avoided and the risk of water vapour occurance reduced. In addition, the rising hot air absorbs already accumulated condensation and ensures faster drying.
- Avoid humidifiers and water vaporizers on radiators if possible.
- When cooking and showering, open the windows so that the moisture can be released immediately. At the same time, keep the interior doors closed so that moisture cannot spread to other rooms.
- Do not dry laundry in the living room to not to increase the humidity.
- Particular attention should be paid to the "sources of moisture" in the room, especially in winter. This means that temporary activities such as cooking or showering, high presence in the home also increase the humidity, as well as plants or pets. So it is better to divide such sources, especially in winter.
TV wall: Read here how you can transform your TV wall to an absolute unique installation.

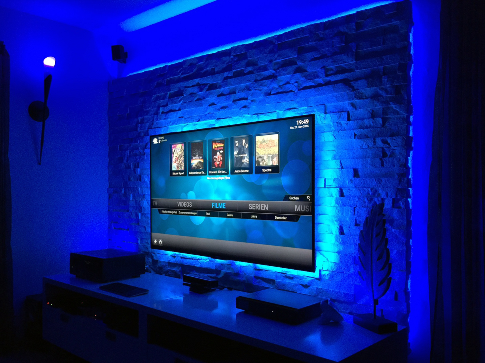
We are very pleased to present with step-by-step instructions how to easily construct the super TV wall. We would like to thank our customer very much, who, because he found very little information on the Internet, he decided to create the visual documentation of his construction project, and also gave a lot of information on the procedure and explained what was done and why. The result is a wall made of bricks that is more than just impressive. Please read our customer's documentation now and get inspired for your own projects. You also have the option of leaving a comment below the text or share your construction's realization. We are very curious how do your projects look like.
Idea, plan, tiles choice
I planned to hang my TV on the wall for a long time. What kept me from doing it? I didn't want to see any supply cables. Or a cable duct - like the many people mount, was out of the question for me.
So I quickly got an idea to build a "wall in front of the wall". But how should it be made? Shall I paint it? Put a wallpaper? But I really didn't want that. I liked stones - I thought.
So after a long search I found this company, which among other things offers a wide range of different bricks, stones and brick slips.
Of course, I had a lot of questions that were answered in a very friendly and competent manner.
So when I ordered the stuff, I still had a bad feeling about this. If the transport works, the goods arrive safely, etc. But what if not? Finally everything arrived in top condition, secured properly. After searching the Internet a lot at the beginning of the project and not finding too much, I decided to document the whole thing a little
My wall was made of YTONG blocks
Stone I chose: Cairo moonlight.
Montage
I mounted 18 mm OSB boards with tongue and groove onto profiles screwed to the YTONG wall. As a TV holder I took an extendable holder, because thanks to it, it would be possibile to adjust the depth later once the stones are glued. Thanks to that TV sits flat and very close to the wall. I screwed the holder with special YTONG anchors from Fischer. It will hold a 65 'TV later.
The nice thing about the holder: If you have to work on the cables later, you can pull everything off very nicely without removing the TV.

When the boards were screwed together, I primed the surface 3 times with a deep primer. The plates are mounted on at the top and on the right little higher than profiles so that they outstand slightly. Thanks to that I installed Philips Hue Stripes + LEDs.

I mounted GKB boards on OSB boards.
Why? That's very simple, on OSB baords gypsum tiles won't hold so easily as on plasterboards boards.
For sure you are wondering why I got started from the top.
Also very simple: The shape of those tiles is not regular and I was afraid, that when I will start from the bottom, top layer would be not perfect (because most probably I would have to cut the tiles in half to adjust them to the boards).
That's why I started from the top.
To prevent tiles from sliding down, I worked with supports. It turned out that it wasn't necessary because the glue dried very quickly. Well, better safe than sorry. ;-)

Starting from the top also had an advantage while gluing. If a little glue spilled nothing stays on the stones.
I cut the stones with a standard foxtail hand saw.
The cuts have to be right-angled.

I had to cut the corners edges. They had to be cut exactly in such a way that the edge of the OSB board and plasterboard was covered.
I didn't mount them right up to the wall, but left a gap. That was intentionally. Now light from the LED tape comes through.
I mounted LED tape in a way that allows me replacing it in the future.

At the bottom I supported the last row with leftover pieces of wood.

Then I primed the tiles to secure them from getting dusty later.
You must be careful there - secure the walls around, so that primer won't make a stains everywhere.

In bottom edge of the holder, I put a cable duct cover to mask the edges where you can see OSB and plasterboard.
You can't see it later after TV montage, but I prefer that way ;-)

Then it was time to lay the cables.
After taking this picture I put more sockets under the wall and repainted the lower edge.

Then I installed the 65'' TV and attached a DIY Ambilight to it, which is controlled via Raspberry.

Then I put a furnitures back. Tiles on the wall look perfect in indirect light.

To sum up:

Work with those tiles is very easy. However, there is also a lot of dust. Therefore, as written above, I sawed tiles by hand, which is really quick. I glued the stone almost perfect. A few spots, where joints are not even could not be avoided totally. But it is not noticeable.
The final result on the Foto doesn't look as good as it really is. It looks just great!
If you have any further questions, please do not hesitate to contact me directly. I will answer you as soon as possible.
Greetings from the North
F.Mollenhauer ([email protected])
Paneele Verlegen – Wie man 3d Holzpaneele richtig montiert

Paneele zählen neben Tapete und Putz zu den beliebtesten Wandverkleidungen. Aber wie verlegt man Paneele richtig? In diesem Artikel zeigen wir Ihnen, wie Sie Holzpaneele richtig anbringen und Ihren Wohnraum eine gemütliche Atmosphäre geben.
Warum Wände mit Paneelen verkleiden?
Eine Wandverkleidung mit Paneelen hat viele Vorteile. Neben der natürlich warmen Optik gibt es noch weitere praktische Gründe Holzpaneele zu verlegen. Hinter der Wandverkleidung können Sie zum Beispiel störende Kabel und Rohre verbergen. Ebenso können Sie Unebenheiten und beschädigte Stellen im Putz hinter der Verkleidung verschwinden lassen.
Wenn Sie einen Raum nachträglich dämmen wollen, eignet sich die Montage von Paneelen bestens dafür. Mit einfachen Mitteln können Sie Dämmmaterial zwischen Wand und Verkleidung anbringen und so den Wärmeverlust reduzieren. Dadurch lässt sich langfristig einiges an Heizkosten sparen. Je nach Größe des Raumes und den Isolationseigenschaften des Dämmmaterials kann sich die Renovierungsmaßnahme mit Wandverblendern innerhalb weniger Jahre amortisieren. Um weitere Heizkosten zu sparen können Sie mit der Installation von Deckenpaneelen die Decke herabsetzen.
Genauso kann die Verwendung von Paneelen zur Schallisolation beitragen und lautstärkeempfindliche Räume vor unangenehmen Geräuschen isolieren.
Paneele anbringen – So wird’s gemacht
Unterkonstruktion für die Paneele anbauen
Um die Paneele später befestigen zu können, müssen wir zuerst eine Unterkonstruktion installieren. Dafür verwenden wir eine schlichte Holzlattung, die vertikal mit Dübeln in der Wand verschraubt wird. Die einzelnen Streben sollten dabei in einem Abstand von ca. 40 cm montiert werden. Wenn Sie sich für eine Dämmung entscheiden, wird zusätzlich eine sogenannte Konterlattung notwendig. Die Latten werden dabei horizontal mit den vertikal verlaufenden Latten verschraubt und bilden damit ein Gitter. Durch die Konterlattung entsteht ein größerer Zwischenraum zwischen Wand und Paneele, in die später die Dämmung eingebracht wird. Mit einer Wasserwaage können Sie die Konstruktion kontrollieren und gegebenenfalls nachjustieren.
Wandverkleidung zum Dämmen nutzen
Wenn Sie sich für eine Dämmung entschieden haben, bringen Sie das Dämmmaterial zwischen der Konstruktion und der Wand ein. Danach wird eine PE-Folie darüber angebracht und allseitig mit der Wand verklebt. Die Konterlattung wird über der Dämmung und der Folie montiert. Bei der Wahl des Dämmmaterials können Sie organische oder mineralische Materialien verwenden, die nicht anfällig für Schimmel und Fäulnis sind.
Aussparungen für Lichtschalter und Steckdosen einfügen</
Im nächsten Schritt werden die Aussparungen für Lichtschalter und Steckdosen in die Paneele eingebracht. Mit einem Lochbohrer oder einer Stichsäge lassen sich die Aussparungen leicht in die Paneele schneiden. Da die Schalter und Steckdosen zu tief sitzen würden, wenn die Paneele montiert sind, benötigen Sie Hohlwanddosen, um die Elektroinstallationen bündig zur neuen Wandverkleidung zu bekommen.
Holzpaneele mit der Konstruktion verbinden
Die Paneele werden nun mit der Unterkonstruktion befestigt. Vor der Installation ist es empfehlenswert, die Paneele ein bis zwei Tage im Raum zu lagern, damit sich das Material an das Raumklima gewöhnen kann. Die Holzpaneele werden mittels Befestigungsklammern an die Konstruktion angebracht. Die Randpaneele sollten mit einem Abstand von ca. 20 mm zur Wand befestigt werden, sodass das Holz genügend Spielraum hat, sich auszudehnen. Dies gilt für alle Kanten der Konstruktion. Die Holzpaneele werden befestigt, indem man die Feder in die Nut des vorhergehenden Paneels montiert. Auf der Nutseite kommt dann wieder eine Klemme zum Einsatz. Überlegen Sie sich vorher, auf welcher Seite sich das Endstück befindet. Das abschließende Paneel muss meist auf die richtige Breite zurechtgeschnitten werden, um die Wand vollständig zu bedecken.
Im letzten Schritt werden die Abschlussleisten installiert mit denen die Dehnungsfugen verdeckt werden. Mit diesem Prinzip ist das Anbringen von Holzpaneelen unkompliziert und schnell erledigt.
Wandpaneele kleben - geht das?
Manche Wandpaneele können auch verklebt werden. Dazu muss die Wand vorbereitet werden. Alle Unebenheiten, Löcher und Risse müssen vorher verschlossen bzw. ausgebessert werden. An der Wandunterseite werden zunächst Unterlegkeile angebracht, damit das unterste Paneel einen Abstand zum Boden hat. Der Montagekleber wird nun senkrecht in Strängen mit einem Abstand von ca. 10 cm aufgetragen. Das Paneel wird dann auch den Unterlegkeil aufgesetzt und an die Wand gedrückt. Nach etwa 10 bis 20 Minuten ist der Kleber getrocknet und Sie können mit dem nächsten Paneel fortfahren.
Paneele an Decken verlegen
Holzpaneele können genauso gut an Decken und Dachschrägen verlegt werden. Nach demselben Prinzip werden die Holzpaneele an der Decke angebracht, nur dass Sie in diesem Fall auf die Aussparungen für die Lampen achten müssen. Wenn Sie eine Dämmung verwenden wollen, was sehr empfehlenswert ist, um gegen Lärm von oben zu isolieren, wird auch hier eine Konterlattung nötig. Wenn Sie Lampen bzw. Spots oder Rauchmelder in die Deckenpaneele einlassen möchten, wird ebenfalls die Gitterlattung nötig. Bei der Überkopfarbeit sind Profilbrettzangen und Nagelhalter hilfreiche Werkzeuge, die Ihnen helfen die Paneele an der Decke zu befestigen.
Welche Materialien und Werkzeuge brauche ich für die Montage von Paneelen?
Neben den Paneelen selbst benötigen Sie die Holzlatten für die Unterkonstruktion inkl. Schrauben und passenden Dübeln, die Nägel und Klemmen. Wenn Sie eine Dämmung einbringen wollen, sollten Sie genügend Dämmmaterial vorrätig haben oder sich zu Menge und Material beraten lassen. Genauso benötigen Sie die passenden Abschlussleisten.
Um die Holzpaneele zu montieren benötigen Sie eine Bohrmaschine, einen Akkuschrauber, und eine Stichsäge oder einen Lochbohrer für die Aussparungen. Ebenso benötigen Sie zum zurecht schneiden der Paneele eine Handkreissäge oder einen Fuchsschwanz. Zur Installation der Latte ist eine Wasserwaage zu empfehlen.
Fazit
Mit der richtigen Anleitung ist das Anbringen von Paneelen kein Hexenwerk. Holzpaneele können auf verschiedene Weisen befestigt werden. Neben der Direktverschraubung und dem Kleben, ist die Befestigung mittels Holzlatten die verbreitetste Variante. Neben hochwertigen Holzpaneelen können Sie auch moderne Steinriemchen oder Verblender in Ziegeloptik kaufen.
Wenn Sie noch Fragen haben oder Beratung wünschen, rufen Sie unser freundliches Beratungsteam an.
Beratung & Service 030 30 807 169
Dachfenster austauschen

Beim Dachfenstertausch gelten prinzipiell die gleichen Empfehlungen. Wenn der Dachboden nicht zum Wohnen oder zum einlagern empfindlicher Gegenstände verwendet wird, muss man hier nicht zwingend auf energieeffiziente Fenster umrüsten. Wenn man allerdings den Dachboden zum Wohnbereich ausbauen möchte, empfiehlt es sich häufig die Dachfenster zu erneuern.
Wann muss ein Dachfenster ausgetauscht werden?
Bei beschädigten oder undichten Dachfenstern kann leicht Wasser eindringen und das Mauerwerk beschädigen. Wenn die Dachfenster nicht mehr richtig abdichten, sollten Sie über den Austausch der Dachfenster nachdenken, um Schimmelbildung oder Schädigung des Gebäudes zu verhindern.
Die Kosten für neue Dachfenster hängen so wie bei Fassadenfenstern von Material, Isolationswerten und Größe ab.
In unsrem online Baumarkt finden Sie riesigen Auswahl sowohl der Dachfenster, Dachfenster Kunststoff als auch passender Zubehör wie Dachfenster Rollos, Markizen usw.
Wir freuen sich auf Ihren Anruf ☎ 030 30 807 169

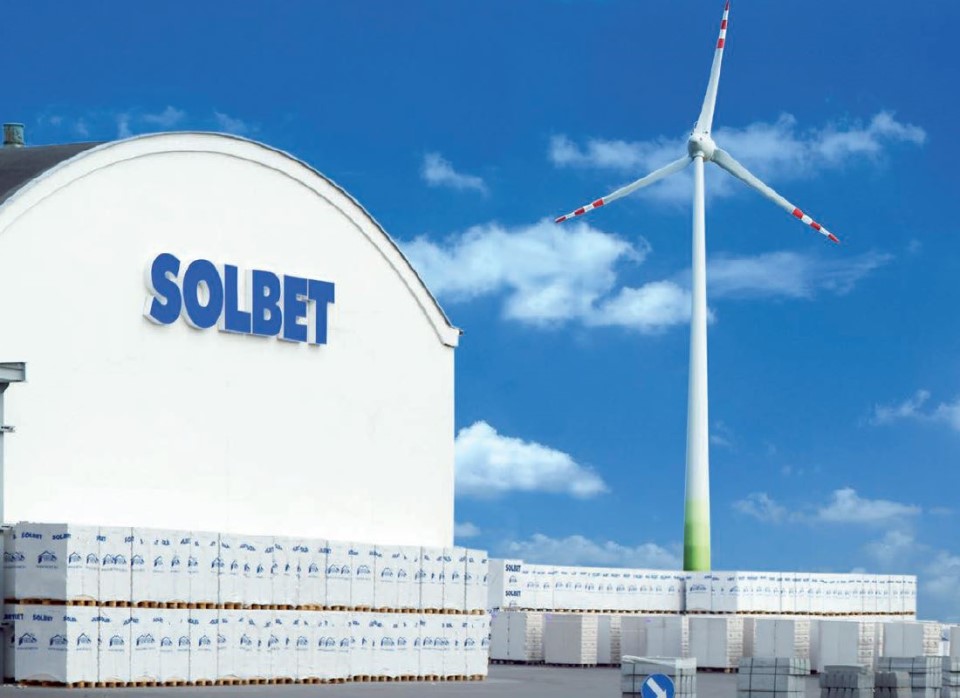
Building with SOLBET cellular concrete from Poland

The largest lightweight concrete producer in Europe
SOLBET is the largest manufacturer of high quality aerated concrete in Poland. The company has been manufacturing aerated concrete for over 70 years. Today, SOLBET has seven production spots where aerated concrete is manufactured, two for construction chemicals and one for reinforced aerated concrete elements, and two where autoclave-treated aerated concrete is manufactured. With a daily capacity of over 2300 cubic meters, the production facility in Solec Kujawski is the largest production facility for aerated concrete in all of Europe. This modern company is the European market leader in the production of lightweight concrete blocks .
The company's proven strategy ensures optimization of production costs, which influences on the pricing policy. This means that SOLBET can offer high quality products at an reasonable price. The excellent quality of SOLBET's products, which is the result of more than 70 years of experience, enables the company to achieve many successes in the demanding European markets. The quality of SOLBET's materials and the technical level of the factories fully correspond to the level of other European manufacturers. The SOLBET brand is present in many European markets. SOLBET concrete blocks from Poland are now sold in Germany, Denmark, Sweden, Norway, Belgium, Russia, Slovakia, the Czech Republic, Hungary, Lithuania, Latvia and Ukraine.
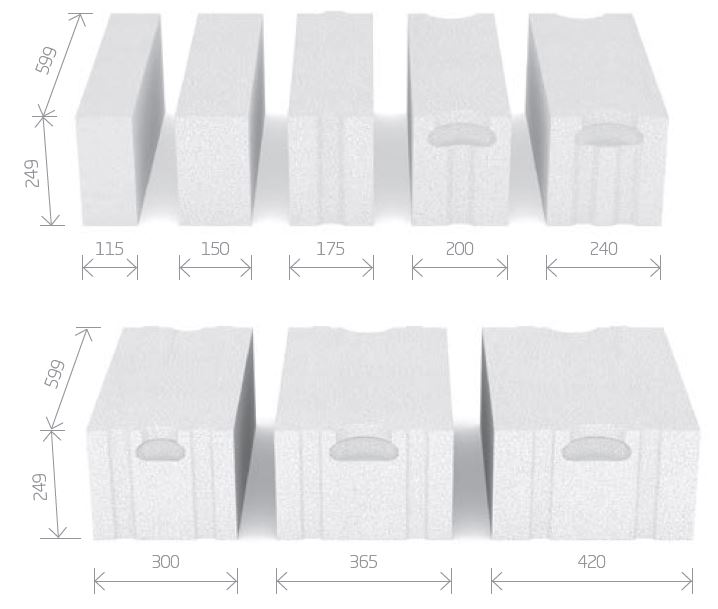
Lightweight concrete blocks are available in the following sizes:
- block PP2-040, 175 mm, 240 mm, 300 mm, 365 mm, 420 mm
- block PP2-050, 50 mm, 75 mm, 100 mm, 150 mm, 200 mm
- block PP4-060, 115 mm, 175 mm, 240 mm, 300 mm, 365 mm

Buildings of SOLBET's aerated concrete
Various types of buildngs can be built from SOLBET aerated concrete: from single-family houses to commercial buildings and industrial buildings. Blocks from SOLBET can be used for the construction of single- and multi-layers on both load-bearing and partition walls. The low dimensional tolerances for the flat blocks mean that they can be masonry with thin joint glue. Buildings made of SOLBET products are solid, ecological and modern.
Is aerated concrete an ecological material?
The company SOLBET works in a closed ecological cycle: starting with the production up to the waste management. The manufacturer continues to invest in modern, effective and environmentally friendly solutions. Two wind turbines, the total output which covers the energy needs of the entire company on windy days, are the company's contribution to the pro-environmental attitude. Only natural raw materials (limestone, quartz sand, water) are used to produce the aerated concrete. The recycling of post-productive waste protects natural raw resources. The low weight of the blocks saves energy during transport. The products are environment friendly and do not emit any harmful substances.
Energy saving
Building with SOLBET's products allows to save energy and heating costs. The special properties of lightweight concrete protect the building's interior from both the summer heat and the winter cold. Thanks to the excellent thermal insulation value, even extreme outdoor temperatures never enter the living space. In this way, the aerated concrete of SOLBET ensures a high standard of living and guarantees that valuable energy is saved. This is confirmed by the well-known test facilities and institutes for material control in Germany such as MP Berlin. This institute carried out the certification tests for the SOLBET materials and confirmed the value of thermal conductivity λ = 0.10 [W / mk].
| Class | Thermal conductivity λ | U-value(W/m²K) | |||||||||||||||||||||
| Size [mm] | |||||||||||||||||||||||
| 50 | 75 | 100 | 115 | 150 | 175 | 200 | 240 | 300 | 365 | 420 | |||||||||||||
| PP2-0,40 | 0,10 W/(m·K) | - | - | - | - | 0,53 | - | 0,39 | 0,32 | 0,27 | 0,23 | ||||||||||||
| PP2-0,50 | 0,14 W/(m·K) | 1,90 | 1,42 | 1,14 | - | 0,81 | - | 0,63 | - | - | - | - | |||||||||||
| PP4-0,60 | 0,16 W/(m·K) | - | - | 1,13 | - | 0,80 | - | 0,60 | 0,49 | 0,41 | - | ||||||||||||
Solid and stabile construction - solid houses of lightweight concrete
The aerated concrete SOLBET guarantees suitable stability of the buildings without affecting the elasticity of the architectural project. The high compressive strength of 2.75 N / mm² makes this material suitable for building bearing and non-bearing walls in all kinds of buildings with different construction and use (also multi-storey buildings). Because the SOLBET blocks are also relatively light, your house will be built quickly and efficiently.
| Class | Compressive strength | Density |
| PP2-0,40 | 2,8 N/mm² | 375 (±25) kg/m³ |
| PP2-0,50 | 2,8 N/mm² | 475 (±25) kg/m³ |
| PP4-0,60 | 5,2 N/mm² | 575 (±25) kg/m³ |
An optimal indoor microclimate
The unique structure of the SOLBET aerated concrete blocks guarantees a healthy and pleasant indoor climate. The low thermal conductivity of the building material makes it possible to achieve a constant temperature inside despite external temperature changes. The porosity of lightweight concrete blocks also ensures that excess moisture is absorbed and collected from the rooms and then released again if the room air is too dry. The uniform porosity ensures that the heat conduction is the same in all directions and that the building material is open to diffusion, ie. breathe.
Acoustic insulation
The sound-insulating properties of building material depend on its own weight. In the case of walls made of aerated concrete, it was found that, due to the porous structure of the aerated concrete, the sound level in relation to its sound-insulating properties is 2 to 3 dB higher than the sound acoustics of partition walls and materials with the same dead weight.
The homogeneous distribution of the air pores in the building material ensures uniform sound insulation in all directions. The walls made of aerated concrete were examined for sound-absorbing behavior in the test institute for structural engineering and received the display value for sound insulation corrected by 2 dB and display value for acoustic insulation RA1R and RA2R.
| Value RA1R and RA2R [dB] depending on the wall thickness [mm] | |||||||||||||||||||||||||||
| RA1R - for inner walls | RA2R - for exterior walls | ||||||||||||||||||||||||||
| Type of block | 50 | 75 | 100 | 175 | 240 | 300 | 365 | 420 | 50 | 75 | 100 | 175 | 240 | 300 | 365 | 420 | |||||||||||
| PP2-0,40 | - | - | 33 | 41 | 41 | 44 | 46 | 47 | - | - | 32 | 35 | 38 | 40 | 42 | 44 | |||||||||||
| PP2-0,50 | - | 31 | 35 | 41 | 44 | 46 | 48 | 49 | - | 30 | 33 | 37 | 40 | 43 | 45 | 45 | |||||||||||
| PP4-0,60 | - | 33 | 37 | 43 | 46 | 48 | 50 | 51 | - | 32 | 34 | 39 | 42 | 45 | 47 | 47 | |||||||||||
Is lightweight concrete fire resistant?
Aerated concrete from SOLBET is made of non-combustible material. Solbet blocks won't be affected by a fire and thus form a barrier against the spread of fire. In the same way, lightweight concrete from SOLBET emits no pollutants or toxic fumes. A partition wall with a thickness of 11.5 cm also has fire class EI 120. The higher fire class REI 240 can be achieved with a wall thickness of 17.5 cm. SOLBET materials guarantee the highest level of safety, even without additional fire protection systems. The fire resistance tests for SOLBET products, which are carried out regularly in the test laboratories, confirm the high level of safety without exception. Because aerated concrete is extremely resistant to high temperatures, the chamber where fire tests are performed on other building materials is built of aerated concrete.
| Size [mm] |
EI | REI | ||||||||||
| walls without plaster | walls with plaster | without plaster | with plaster | |||||||||
| Utilization factor | Utilization factor | |||||||||||
| α ≤ 1 | α ≤ 0,6 | α ≤ 1 | α ≤ 0,6 | |||||||||
| lower limit value (LG) | upper limit value (UG) | LG | UG | LG | UG | LG | UG | LG | UG | LG | UG | |
| 60 | EI 60 | EI 90 | EI 90 | EI 120 | - | - | ||||||
| 80 | EI 90 | EI 180 | EI 120 | EI 180 | - | - | ||||||
| 100 | EI 90 | EI 240 | EI 180 | EI 240 | REI 30 | REI 120 | REI 30 | REI 120 | REI 30 | REI 120 | REI 30 | REI 180 |
| 120 | EI 240 | REI 60 | REI 120 | REI 90 | REI 120 | REI 90 | REI 120 | REI 120 | ||||
| 180 | EI 240 | REI 90 | REI 240 | REI 180 | REI 240 | REI 90 | REI 240 | REI 180 | ||||
| 240 | EI 240 | REI 180 | REI 240 | REI 240 | REI 180 | REI 240 | REI 240 | |||||
| 300 | EI 240 | REI 180 | REI 240 | REI 240 | REI 240 | |||||||
| 360 | EI 240 | REI 240 | ||||||||||
| 420 | EI 240 | REI 240 | ||||||||||
Highest resistance to atmospheric factors
SOLBET's lightweight concrete is resistant to many atmospheric conditions. The chemical composition of aerated concrete prevents the development of dangerous microorganisms. Due to the strongly alkaline reaction of the material and the rapid attenuation, no bacteria, mold or fungi develop on the aerated concrete surface.
All types of walls
Each SOLBET product is manufactured with very high dimensional accuracy. The blocks and u-blocks are offered in many dimensions. This means that many types of walls can be raised with SOLBETl. The simple processing of the aerated concrete elements means that there are no architectural boundaries. With the lightweight concrete elements, you can build from the basement to the roof in a flexible way. With those blocks even arched partitions, efficient fireplaces or a bathtub coating can be built.
What is the cost of lightweight concrete blocks?
Due to the low weight and the relatively large dimensions of the building blocks of SOLBET, the construction work is simple and efficient. By using lightweight concrete, the construction time can be significantly shortened, which helps to reduce your costs. A block of aerated concrete can replace several bricks. Thanks to the profiled side surfaces of the blocks, it is not necessary to fill the horizontal joints with thin-joint glue, which speeds up the construction work and reduces the purchase costs of thin-joint joints. Another advantage of lightweight concrete blocks is their high dimensional accuracy, which allows them to be built with a thin layer of mortar. Building walls is like a child's play - the individual block parts can be easily cut to the desired size and their construction only requires the use of simple tools. The best proof is the construction of the International Fund "Habitafor Humanity", which was built from SOLBET's materials and by the volunteers.
The highest quality
Many years of experience, the trained employees, the modern production system and the high level of ambition help to manufacture SOLBET products with the highest possible quality. The quality management system has been introduced in SOLBET factories. SOLBET products received ISO 9000 and OHSAS 1800. Every block that is manufactured, before it leaves the production facility and reaches the customer, must meet the requirements of the strict quality control system.
VELUX vs SkyLight and OptiLight. Quality comparison.

A lot of customers questions mainly concern SkyLight roof windows: Are they comparable to VELUX? VELUX is still a synonym of the highest quality windows, which is also reflected in their price. Is it right to judge only according to this criterion? This clarifies that SkyLight obviously cannot have the same quality. But, is it really so? How should the two cheap brands of roof windows made of plastic - SkyLight and OptiLight - be judged on the basis of quality? To do this, you need to get to know a manufacturer.
Roof window SkyLight at a reasonable price
SkyLight windows are manufactured by Skyfens, a Polish manufacturer of plastic windows that started production in 2000. The company wanted to focus on plastic roof windows that would fit in the low-price segment. To be able to guarantee this, they use already existing technology - common in the plastic facade windows. In this way, the time-consuming and costly acquisition of additional production systems can be minimized. Technology used in PVC frame and steel reinforcement inside it, ensuree that those windows are relatively massive and therefore have very good stability and robustness. Only in the field of "window fittings" Skyfens had to find a different solution than the one that exists in PVC vertical windows; no further investment was necessary, which could ultimately be reflected in the price. The manufacturer also decided to not invest in production of the additional accessories (there are although other suppliers, that offer basic accessories for SkyLight windows - such as blachout blinds and awning blinds). Thank's to that Skyfens was able to keep the prices low. Another cost factor is always the marketing. SkyLight refrains from doing this and trusts retailers to place the product on the market and the price itself speaks for the product and increases sales accordingly. This strategy works quite well.
Conclusion:
When it comes to SkyLight windows cheap doesn't mean poor quality. The brand stands for plastic windows that have a very good ratio between price and quality. So if you are looking for skylights at a reasonable price (where is no alternative for other types of glass or custom-made products) and fact that there are only limited quantity of accessories that would fit to that window is acceptable for you, Skylight windows are good choice for you. Ten-year warranty and the ability to send spare parts (even if the waiting time is a bit long sometimes) also increases the security that the service life of the skylight is planned for a long time.
Roof window OptiLight at a reasonable price
Optilight windows are being produced by the company named Kronmat, which is a subsidiary of FAKRO. OptiLight windows are basically a response of FAKRO to the increasing demand for cheaper roof windows. Even though FAKRO itself is the world's second largest manufacturer of roof windows, the company is interested in taking some part of cheaper windows market. OptiLight had a bit wider offer from the beginning than SkyLight. In addition to the plastic windows (Optilight TLP) there are also wooden windows (OptiLight B), with permanent ventilation (OptiLight VB) and even - very atypical in the cheap segment - a top-hung skylight (OptiLight VK). The production is of course based on FAKRO technology, for example the plastic roof windows TLP are almost identical to the PTP model of FAKRO, with only a few differences. But those who buy an OptiLight window basically buy FAKRO quality at much lower price. In addition to the price, these windows have another, very big advantage: They are designed in such way that a lot of FAKRO accessories, such as the ARF blackout blind or AMZ awning blind, can also be mounted on the OptiLight windows. Of course, not all products of FAKRO are kompatible with OptiLight and sometimes they are not the cheapest, but the most important thing is that customer an choose between many products to find the perfect one. Thanks to that you can adjust window look to your interior design. Also the manufacturer does not run marketing, which makes the total production costs lower.
Conclusion:
In terms of price, OptiLight is a really interesting product and at the same time it's quality is very good. A big experience and FAKRO technology go with OptiLight. There is also a wide range of accessories that may not be available at as good a price as the windows themselves, but if you save money on skylights then buying only accessories is not such a big cost.
Lower price is possible to obtain, because no special requests are taken by Kronmat - they sell only products and sizes available in the standard offer. To compare - well-known manufacturers such as VELUX, FAKRO or Roto invest a lot to offer as wide range of products as possible and they meet all customers' needs. That causes the costs, but customer can be sure that there's a lot really well designed products to find. A cheap manufacturer can not - and doesn't want to - do that. Strategy of such compans is actually about selling as cheaply as possible. A cheap manufacturer will achieve this in the long term only if the quality of the product is at least satisfactory, otherwise his product will not be able to last long. Our previous customer reviews confirm quite clearly that a good price and good quality go hand in hand when it comes to both SkyLight and OptiLight

Read our guide now


PayPal about baubaY.de
You have happy customers, a good track record with PayPal and we have the info we need to keep your account secure.
In other words, you’ve got an excellent history with PayPal. Keep up the amazing work.


![]()
![]()
![]()